Showing posts with label apollo transparency 7039. Show all posts

Monday, April 25, 2011

Don't Mess With Mother Nature

New canvas. New Recipe. 
Ingredients:
ink jet images printed onto
Apollo transparency film,
 acid free tissue paper,
A bottle that sprays a fine mist 
filled with 70% isopropyl alcohol, 
acrylic paint, canvas,
collage images. 

Thoroughly spray the ink side of the image on the transparency sheet with the alcohol spray. Not dripping wet, just covered. Lay the image sprayed side down on the tissue. Lightly press image with a bone folder just to make sure image is in full contact with tissue. This step isn't even necessary every time, most of the time the tissue just sucks the ink right into it. Wait like 3 minutes, and pull up a corner to see if ink has transferred. If it has, pull off the transparency sheet. It should be clear. Below you can see how clear the sheet is when the transfer works perfectly.


Below is the 8x10 canvas collaged  with images from my stash and painted with Golden's heavy body paint. I thought it was too shiny, so I covered it with matt gel medium. Big mistake. Along the way I added glossy Soft gel medium and I liked it again!


Fooling around here with possible compositions.


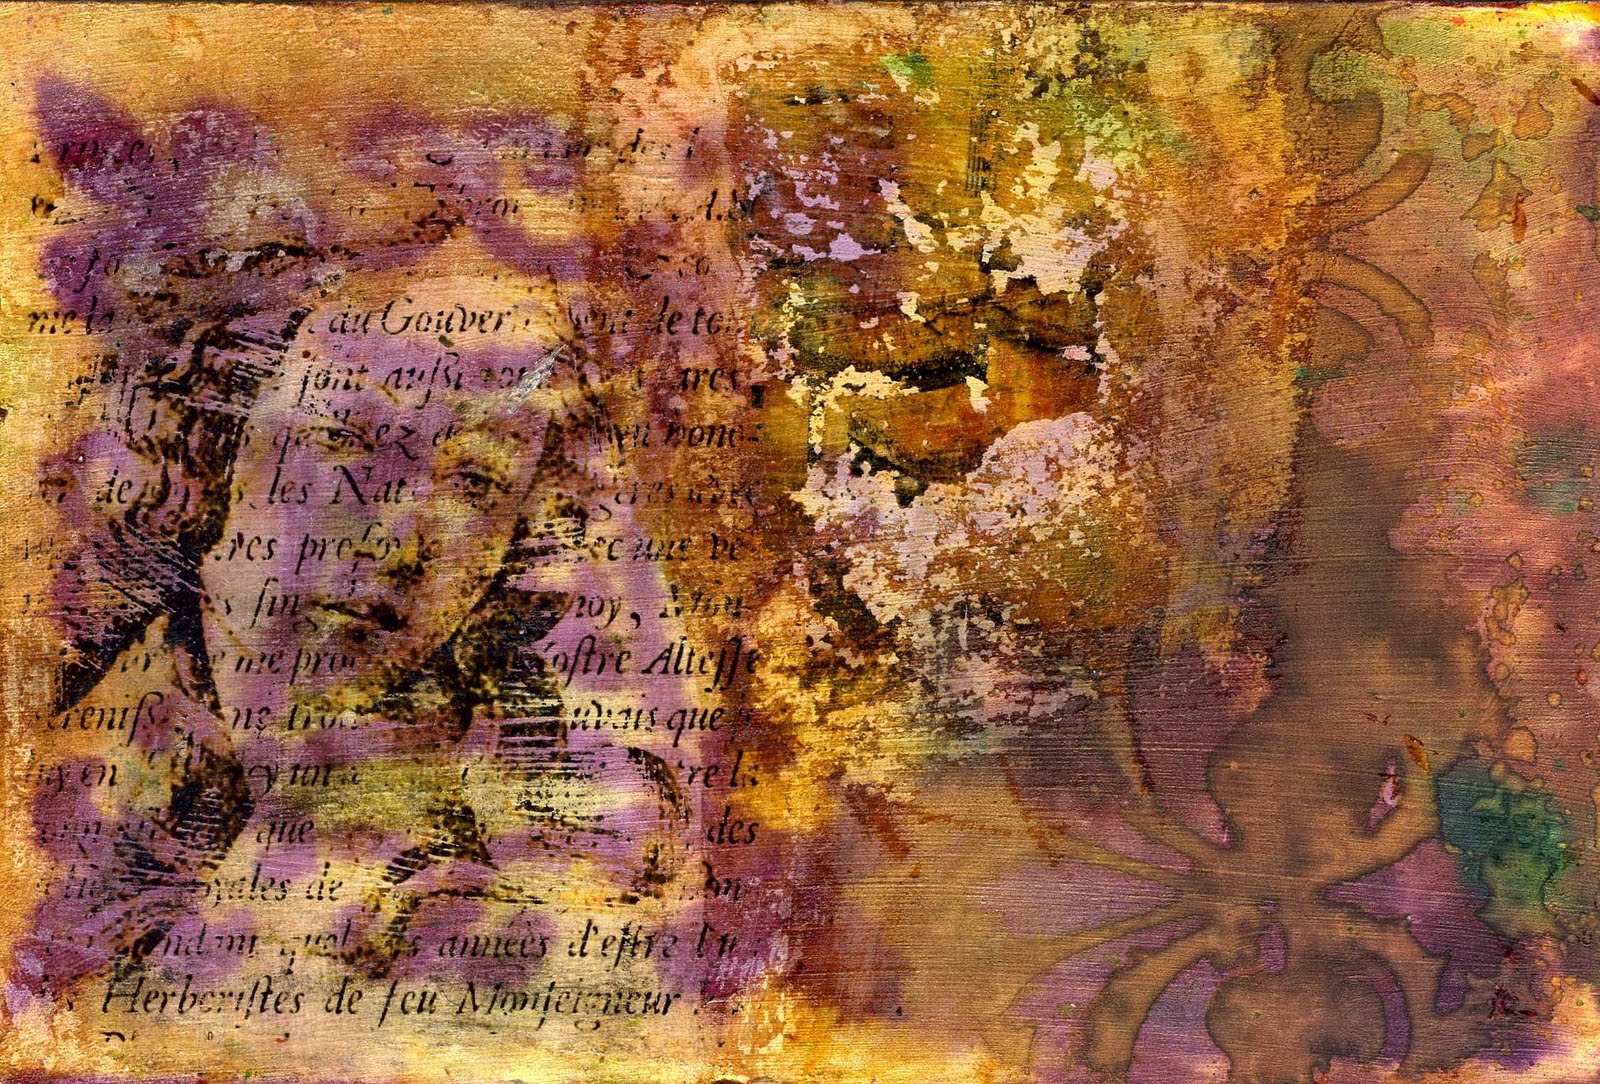
And here is the finished collage:
"Mother Nature"

Prints available on my etsy site. 
Thanks for looking!
xoS

Tuesday, July 20, 2010

BroknHearted Venus

That last background was pretty but kinda bored me. I've put it aside until Broknhearted inspiration hits.
So instead I embarked on 3 collages at once! I pulled out my stash of favorite commercial and self made paper and ripped and glued my way to happiness! The collage that most captured my interest started out like this:
Here the canvas is completely covered with paper and in the process of being drybrushed with gesso:
Used Caran D'Ache crayons to add some hair and have taped images around to figure out the composition I like most. The images are Apollo 7039 transparencies printed with an inkjet Epson C88 printer which uses Durabrite inks:

Wouldn't this be an awesome Blog Header? The collage sheet with Venus' image and the words is courtesy/property of Misty Mawn. You'll have to ask her for permission to use it as a header!! I did my part!! I used crayons and made it my own!! Thanks Misty!


Here are the tools for a caulk transfer ready to go:

The first transfer. You can see I used yellow crayon to outline the cut out image. This was done so I could see where to lay down the caulk with the least waste. I am still VERY new to this technique. In this photo, I am holding the now devoid of ink transparency.

Here is the wet transfer: I blended the edges into the canvas with the palette knife. You can see there are some areas where the ink did not transfer. Its ok. Distressed, I believe is the au currant term. I f'd up is what I would say. teehee.

Here is what Buddy Guy was doing while I was creating. He thinks he is a dog. He loves to chew. My paper towel rolls are fair game.

I had some extra caulk on my palette, so I used it up in my practice book pages. The manuscript and chess piece are good, the arches not so good, I used too much caulk in that spot. The girl and corner post thingy were both soft get medium transfer. Caulk beats that for clarity, IMHO.

Here comes the Tricky Part: adding the caulk to the face for the shell transfer. I think I used a little too much. I can't wait until Trial and Error becomes Experience. Feel me?? If I mess up the face, I've wasted Time, Effort, Supplies and My Sanity. Sweatin It Big Time:

48 Hours later. Caulk still not set well enough for me to do a couple more glazes and some detail work with pencils/crayons. I may even add a few more small transfers. My wheels are still turning.

This collage has a title I will add to the canvas. I think it's perfect. You'll see it when it's all done. Thanks for joining me for this Work In Progress! Now, whatcha think???? Good or Bad Give It To Me Straight. xoSusan

Friday, June 18, 2010

Transfer Fun

I worked a little more on Lesson 2 from Julie Prichard's Layer Love class. The class steps are all done, but I got inspired by the background and started adding things.....My first addition was a crow transfer using Elmer's Caulk, inkjet image and transparency. Thanks go out to Marianne from Marianne's Art Blog for the caulk, directions, image and inspiration!! Mk ROCKS!! plus she has awesome taste in music...just sayin.

Here is the inkjet image printed on transparancy:

India Ink and calligraphy pen vines:

I didn't wait long enough and some of the transfer lifted, so I just painted in the blank spots:


Goin to fill in with some more paper here and there I think, highlight the vines more....Tell me what you think.....xoSusan

Sunday, April 18, 2010

Elmer's Caulk Transfer Play

As you are well aware by my previous post,teehee, I am having a grand time playing with inkjet transfers using Elmer's Caulk and Apollo 7039 transparencies. Just as a reminder, I use an Epson C88 with Durabrite inks. I am working on cardboard that has been gesso'd and painted with various sprays and acrylics. I am still enamoured of All Things Medieval since attending Lynne Perrella's Medieval Manuscript Workshop, which is evident in my "practice book."

I am just overjoyed at the ease in which transfers happen using the above recipe. I will be grateful to Marianne FOREVER!!! teehee. I am having so much fun, because the success rate is so high, and even when it isn't exactly what I was going for, I can make it work. So here is my FIRST Elmer's Caulk transfer:

Got my supplies together....
Laid down some Elmer's Caulk, set tranparency down, burnished with bone folder, and lifted TOO SOON. Marianne's directions said WAIT several moments for the caulk to set. Could I wait? NO. Therefore this blob, which will be attended too, have no fear. But the bits that did transfer gave me HOPE!!! The bits were, good, good I tell ya, clear, detailed with tons of promise!!! So I calmed myself down, and tried again.

oh JOY oh Rapture!! look at that!!! Almost Perfect!! I left my camera at TMG's house so these pics are taken with my iphone that, alas, has no flash, no zoom or macro feature. Apologies. Anyway, after the above success it was a free for all :
I like a smoother burnishing hand that a rag affords, rather than the bone folder.
Look at that clean transfer!! Then I started playing with other pages:


Now before I did the Caulk Transfer's on this page, I tried to use a Chartpak Blender Pen to do a transfer of the castle onto this page:


Saturate small area with pen and burnish, burnish, burnish. Well ventilated area please.
Lift, and Nothing Transferred! Well, the paint did attach to the copy....
So the hell with it, I cut it out and attached it with Golden's Self Leveling Gel. I'm sure there are successful ways to use this technique, but I just don't see the point. Can someone enlighten me?? Well, I like a transfer sometimes that doesn't have the raised and glossy or satin area of caulk or gel medium surrounding it. I can see a definite need for that. In that case I would probably use an alcohol spray or Purell transfer to UNPAINTED paper. For example if I wanted to transfer an image on top of some vintage writing or paper, and I wanted a surface without texture. Ok, I just did that answering my own question thing. Anybody else ever used the Chartpak pen and if so, in what capacity? I would love to hear other Artists input on that.


So, moving along, Here is a page 80% completed, I think I may add some more writing in the upper left corner, cutting thru the heart, maybe:


It's probably not politically correct to say you LOVE your own work, teehee, but I LOVE this!!! Not bad for playing and practicing. The lyrics to the strip of music are:

"When three long years had passed away, A Knight shall wed with me."
"O thou shalt have a milk-white steed, If thou shall wed with me."
"O thou shalt have a golden crwon, If thou shall wed with me."

Holy High Expectations, Batman!!! anyhoo, there are 2 caulk transfers, the woman and the tassels, stamping, embossing, a torn piece of vellum paper printed with gold sheet music, which I then did the heart caulk transfer on top of. The arrow thru the ring is a transparency piece I glued on with DG3 because I didn't want to take a chance and mess up her features by doing a caulk transfer. I have found with playing that you can LAYER the transfers on top of each other!!! YAHOO, more on that later. I sprayed all with an acrylic sealer. I like how the sealer dulled down the arrow over the face. It was way too reflective before spraying.

That is all for now, I have lots more I could share, but I am itching to create with my new found knowledge and I have been on this computer for hours. Thanks again, Marianne. And thanks to all who visit and leave inspiring and kind comments!! xoSusan

GOT CAULK?-Ode To Marianne

Remember the song "Last Night a DJ Saved My Life" by Indeep. Admit it, you know you do. Here it is in all its glory, play the video by clicking the arrow but scroll down to my amended lyrics and read while the music plays, oh and Crank it UP!!:


Last night Marianne saved my life
Last night Elmer's Caulk saved my life, yeah
'Cause I was sittin' there frustrated to death
And in just one breath, Marianne said
"You gotta get up, you gotta get up, you gotta get Caulk girl"
You know you drive me crazy, Transfer
You got me turnin' to another Artist
Marianne sent some Caulk and Directions to my home


Success, why you leave me all alone ?
And if it wasn't for the Caulk in the Mail , I don't know what I'd do, yeah
Last night Marianne saved my life
Last night a Good Transfer saved my life from a Broken Heart
Last night Marianne saved my life
Last night Elmer's saved my life with some Caulk


You know I hopped into my car, didn't get very far, no
Because I had Transferrin' on my mind, why be so unkind ?
You got your Techniques all around, all around this town
And I was trapped in love with Purell and I didn't know what to do
But when I turned to Marianne's directions, I found out all I needed to know
Check it out


Last night Marianne saved my life
Last night a Good Transfer saved my life from a Brokn Heart
Last night Marianne saved my life
Last night Elmer's saved my life with some Caulk


Last night Marianne saved my life
Last night a Good Transfer saved my life from a Brokn Heart
Last night Marianne saved my life
Last night Elmer's saved my life with some Caulk
Hey, listen up to My Bloggin Friend


You better hear what She's got to say


There's not a Transfer that Elmer's can't fix
'Cause Caulk can do it in the mix
And if your Transfer gives you trouble, just break out the Caulk on the double
And you don't let it trouble your brain
'Cause away goes trouble down the drain
Said away goes trouble down the drain
Well, alright
Caulk time
Last night some Caulk saved my life
There's not a Transfer Elmer's can't fix
'Cause Caulk can do it in the mix
In the mix, in the mix, in the mix, in the mix
In the mix, in the mix.

xoSusan

Tuesday, April 6, 2010

Medieval Trial and Error Journal

Remember when I posted about the cardboard dividers in the cases of cat food I buy? I posted about gesso'ing and painting them. Here are a couple pics:


Okay, now you remember! I use these pages to play and practice techniques, I'm not looking to create "works of Art" here. teehee, as if. I have had a very stressful couple of weeks with my health, leaking roof, full scale ANT attack, fender bender and all the repairs and insurance BS that entails, and I created a journal page that reflected my mood. Be afraid, be VERY afraid. teehee. I started with the gesso'd cardboard that I painted with stencils and glimmer mists:
I then tried and botched 2 transfers using the ink jet image printed on Apollo 7039 transparency and Golden's Soft Gel Medium technique. Venus isn't too bad, but she is very light. Either not enough gel medium or I didn't burnish enough, or I didn't wait long enough before lifting the transparency. The middle blob was definitely too much gel medium.

So in an effort to fix this mess, and because I was in the mood, finally to create, OH WAIT, there goes my EYE TWITCH!! Have you ever gotten that?? My right eye lid twitches like MAD!! I look like a crazed winker! Being an EYE CARE Professional, I can tell you for sure that if your eye lid TWITCHES like CRAZY you are STRESSED OUT Beyond Belief and it is imperative that you book a cruise immediately. teehee. Okay, back to reality.......I used Goldens Light Molding Paste thru a stencil and let it dry overnight. I used Caran D'ache sticks to color the paste. Then I outlined and highlighted areas with a charcoal pencil. I went over Venus with my lastest discovery/addiction, courtesy of Teesha Moore's site in which she talks about journaling, a Faber Castell Pitt brush pen. This baby writes over anything. It wrote over the waxy/oily Caran D'ache and the gel medium blobs. Oh yeah, I'm in love. The very Dark and Depressing Poem, courtesy of my Dark and Depressing Mind Set, is taken from, any guesses here,???? you guessed it "Wuthering Heights".

I think I like the page better before I did a damn thing too it. I hate when that happens. teehee. xoSusan

Friday, February 26, 2010

Yet More Anti-Valentines 2010


Only 3 more days in February....got to get these out of my system by then....same techniques as previous 3 posts....xoSusan

Tuesday, February 23, 2010

MORE ANTI-VALENTINES 2010


I used the inkjet images printed on Apollo Transparencies 7039 and alcohol spray technique on these ATCs. The inkjet images are scans of my abstract paintings transferred onto scrapbook paper glued to baseball cards. The words are inspired by old Blues tunes with a sprinkle of my sarcastic humor thrown in. I owe a HUGE THANK YOU and a TON of HUGS to June from Art Freebies. I got almost all of the images used for this years batch of Anti-Valentines from her generous site. Visit her and tell her BroknHeartArt sent ya. xoSusan

Sunday, February 7, 2010

ANTI-VALENTINES 2010

As the Allman Brothers Band blasted in the background (looking forward to the upcoming concerts I will be attending in NYC, and yes that was Concerts PLURAL yahoo and teehee), I started working on this years Anti-V's. I decided to use scans of some of my abstractish paintings on top of sweet hearty scrapbook paper. Paper that I will never use otherwise, left over from when Sam was a baby and I documented every burp and coo. Who could blame me, she was a gift from the universe YEARS in the trying and finally making. BTW Miss Samantha's 16th birthday is my Valentine present every year. Yup, she was born Feb. 14. But I digress. Alcohol spray/ink jet images/Apollo 7039 transparencies are my favorite and consistently successful way to transfer images. Alas, this technique WILL NOT WORK ON TOP OF ACRYLIC PAINT, so I am going to be using scrapbook paper as the substrate a lot from now on. Both to use it up, and to make it my own.

Above are the scanned ink jet images printed on Apollo 7039 transparencies using my Epson c88 and Durabrite inks.

Above, I have 70% isopropyl alcohol in a recycled perfume mister. Spray the transparency until it is thoroughly covered, but not dripping. Lay the image down on top your receiving paper.
Gently brayer the image. Then lift a corner to see if the ink is sticking to the paper.

The above 2 are not perfect transfers. Doing transfers = embracing imperfection. Difficult, but you can do it!! teehee. See the ink left on the transparency above? Mist that spot with alcohol again, burnish that spot using your bone folder, and it will stick!!! You can repair these, quite easily. Or leave it nice and grungy, your call.
Above is one of the best transfers of the day. Look how clean the transparency is!!After they dry, you can fill in any blank spots with paint washes, or crayons, ink you name it. For this project I will be using Portfolio Water-Soluble Oil Pastels.
When the transfer is dry, I like to go over it with steel wool. It smooths out the finish and removes any sticky residue. You can skip this step. For these AV's I will be adding images of couples so I want my substrate smooth.

Here are a bunch ready to be embellished. If you look close you can see the sweet little hearts under the abstract splashes of color. I have started embellishing, but am not ready yet for show n tell!! I am doing a few sweet for a couple sweeties, but mostly they will be sour!! Remember, they are Anti-Valentines, after all. I hope I get them done on time!! xoSusan